
A perfected homemade version of the Levant specialty! Delicately crunchy smooth knafeh crust, cradling a molten layer of gooey gooey cheese. A drizzle of scented sugar syrup, adds the finishing sweet touch to the classic favorite! Plus…
Welcome back to another deceptively simple Middle Eastern recipe that drove me to the brink of hopelessness!
Even in Egypt, where I live, and where kunafa/knafeh is wildly popular, this type of knafeh, is barely heard of. Thanks to the recent welcomed immigration of Syrians to Egypt, it’s just paving its way to popularity. This type of Knafeh is Palestinian in origin, blooming specifically from the city of Nablus. It then spread among other Levant countries like Syria, Lebanon, Jordan, as well as Turkey; so it comes to no surprise that it’s a specialty of that region. It’s known by Palestinians and Syrians as Knafeh Nabulsia, but named Knafeh Na’ameh in Lebanon and Jordan. I was so torn between which name to give it on the blog, that I even ran a poll on Instagram, which gave me 50/50 results (very helpful I must say 😂), until I finally settled upon Knafeh Na’ameh, as Nabulsia is more commonly associated with the orange dyed, coarse one. One thing I knew for sure, is that I wanted to pronounce it ‘knafeh’ not ‘kunafa’ as it is in the Levant dialect. Whatever name you decide to call it though, it’s one of the most delicious things that could enter your mouth.

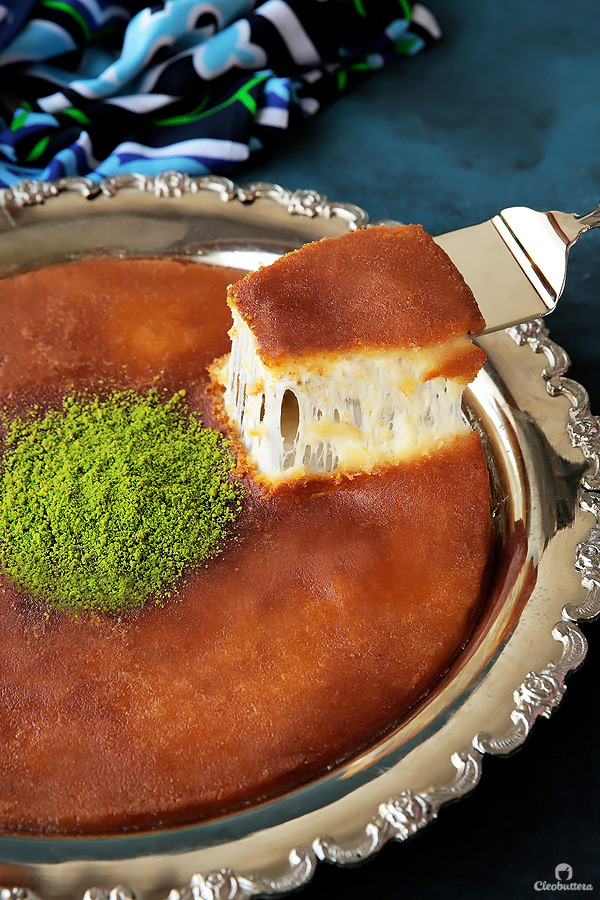
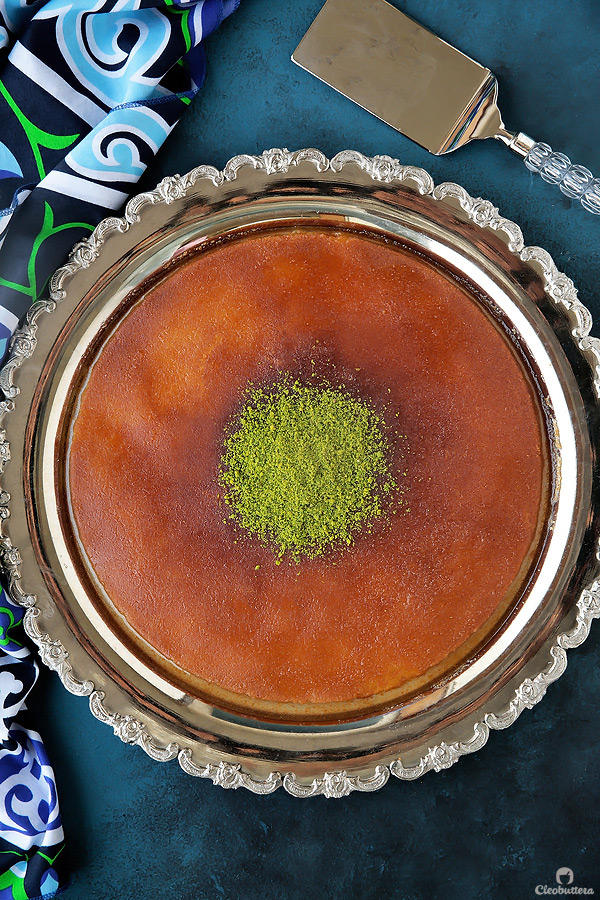
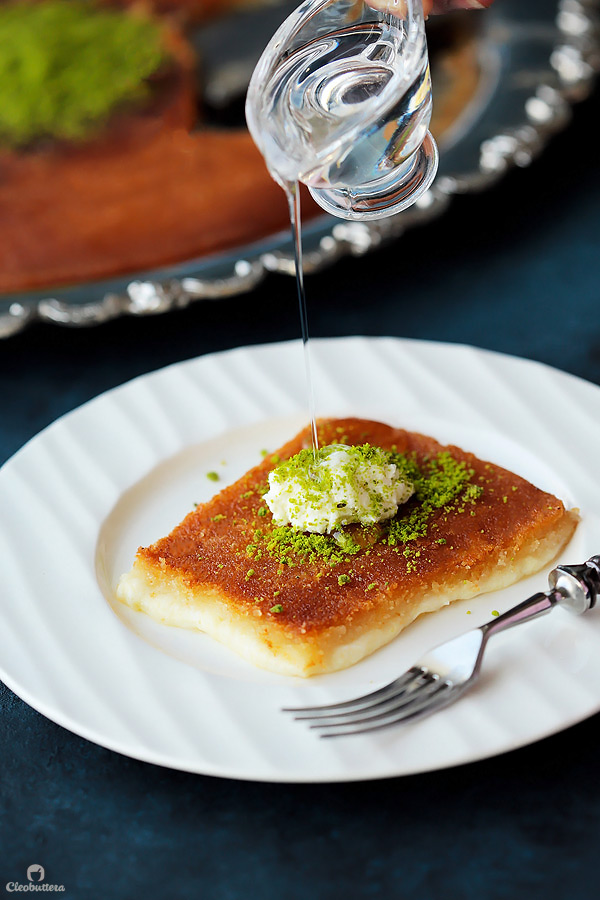
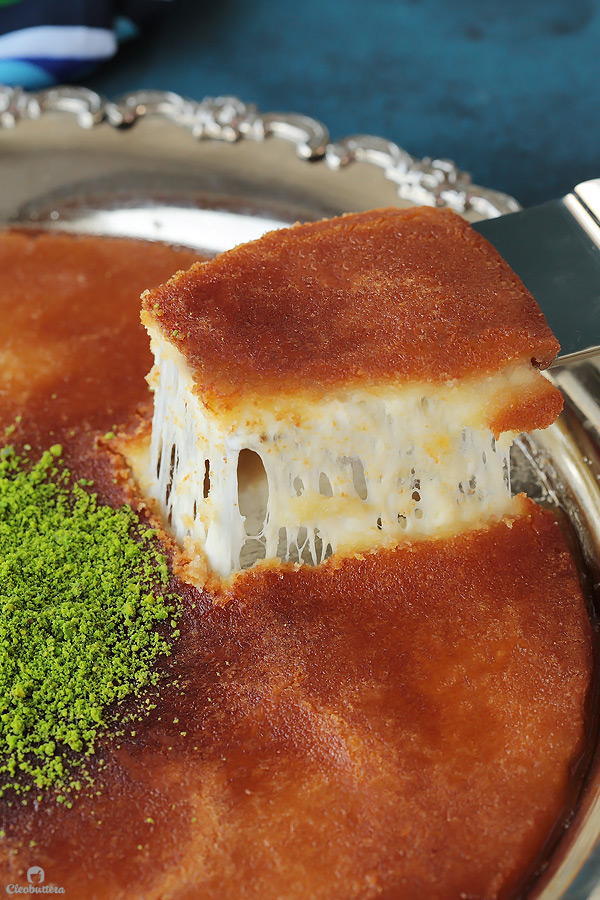
It is characterized by its slightly crunchy, smooth yet sandy crust reminiscent of basbousa. Unlike the other type of coarse knafeh/kunafa which is typically violently crunchy, and has a top and bottom crust, this one has only one layer of crust on top. Underneath that delicate crust is an irresistible layer of molten, ooey, gooey unsalted cheese. The whole thing is sweetened with scented sugar syrup and optionally topped with a dollop of eshta (Arabic-style clotted cream) and a sprinkling of ground pistachios. Heaven.
The first time I had Knafeh Na’ameh was during a trip to Beirut, Lebanon about 10 years ago, and have been obsessed ever since. I then had it a few times at Lebanese restaurants in Cairo and Toronto, but it wasn’t nearly as magical. That’s when I knew it was high time to recreate it at home.
There were 3 things to tackle here: the crust, the cheese and the baking method.
People living in the Levant have it easier than the rest of us, as the crust mixture is sold already prepared and ready to use. They also have the right kind of cheeses that ensures the prefect flavor and gooey texture. Since we’re not as lucky with easy accessibility to that stuff, I had to experiment A LOT to get it as close as possible to the unforgettable one I had in Beirut. It took me a long time to discover what worked and what did not work for me, but in the end, I did it!
Before I bore you with all the juicy details of the journey…here’s a quick look to get you excited!
I. The Cheese.
Authentic Knafeh Na’ameh is typically made with Arabic cheeses like Akkawi or Nabulsia. And after some digging around, I also found out that Shelel and Majdoula, are also commonly used. These types of cheeses have an elasticity similar to mozzarella, but a unique flavor profile of their own.
So in true geeky Cleobuttera fashion, I tried them all, both alone and in different combinations with each other. Akkawi alone tasted great but was rather rubbery and did not give me that ridiculous stretchiness I was hoping for. I had the same issue with Nabulsia too. I found that to be mind boggling, since almost every ooey gooey YouTube knafeh tutorial I’ve watched uses Akkawi with super stretchy results. I came to the conclusion that perhaps the Akkawi we have in Egypt is different from what is available in the Levant. My hypothesis was confirmed when I watched several videos that explain that there are 2 types of Akkawi: Baladya or generic unspecified akkawi (which tastes great, but does not stretch well) and Tchiki (which is not as flavorful but has good elasticity). Though Tchiki was a lot harder to find, I finally did and it really is something else. I wasn’t as lucky with finding good quality Nabulsia cheese though.
Through all the testing, my favorite cheese mix proved to be a combination of Tchiki Akkawi and Shelal. Shelal is a Syrian braided cheese with an incredible elasticity that can be mistaken with melted marshmallows. Insane! It was a revelation! The flavor though is a bit flat, so I found it neccessary to enhance it with Akkawi to get the best of both worlds; shelal for that to-die for stretchiness and Akkawi for flavor. After experimenting with different ratios, my family and I agreed that a little less that 2:1 ratio of shelela to akkawi is the winner. However, if you can’t find Tchiki Akkawi, the more typical Baladya Akkawi can be used with a 3:1 ratio of Shelal to Akkawi to compensate for the loss of elasticity. I’ve also included other cheese options and ratios in the detailed recipe below, depending on what cheese you might or might not find.
The thing about these types of cheeses though, is that they’re loaded with salt for preservation.
So they must be soaked in water, changing it every 1/2 hour, to remove all the saltiness, before using them in the knafeh. Depending on the salt content of the cheese and how small you slice it, this process can take from 2 to 6 hours. I like to do this the night before and slice the cheese as thin as possible. I also prefer to soak each type of cheese in a separate bowl, because they can desalt at different rates.
II. The Crust.
While that’s happening, you can prepare the crust, better known as ‘Farkeh.’ Knafeh Na’ameh crust (farkeh) can be done in two different ways. The first one is using a semolina flour based dough that you bake, then grind into a fine powder, and the second is using kunafa/kataifi dough as your base. I tried several recipes for the semolina one but failed miserably. It would turn out so greasy and too gritty; not a pleasant experience at all. So I turned to the kunafa dough method and used this video as my guide, but improvised on it to make it home equipment-friendly, and using mainstream kunafa/katiafi that can be easily found.
The really nice baker in the video, uses a meat grinder to make the dough. Since I don’t have a meat grinder, I used my handy dandy spice grinder instead and reworked the order of the method. Rest assured, I’ve included both the meat and spice grinder methods in the recipe details, so you could use whichever one you have.
First, you grind semi-frozen strands of kunafa in a spice grinder until super fine and powdery. A regular food processor won’t work here because it’s unable to grind it as fine.
You then mix the ground kunafa with melted ghee, water and sugar syrup. It will look like couscous at this point, and will be very damp and sticks to itself when squeezed between the palm of your hands.
So you’re gonna take it to a skillet and toast it until it dries out and feels dry and sandy and no longer sticks to itself. You want to be careful not brown it, but the color will become about one shade darker. At this point, you could freeze the farkeh (crust mixture) for months!
When ready to use, remove 3 tablespoons of the farkeh and set aside, then evenly press the remaining farkeh over a ghee greased aluminum or copper pan. The type of pan is really important here, as the knafeh will be cooked over the stove not in the oven, so any other material will not handle the heat of the stove.
After draining the cheese, squeezing all the liquid out and mixing the 2 well together, you spread it over the knafeh crust, leaving a 2cm border around the edge uncovered. You don’t want to go all the way to the edges, or the cheese will burn and stick to the pan. Plus…when it starts melting, its gonna spread on it own anyway.
III. Baking Method:
Now…baking time! Or more accurately…cooking time since it’s done over the stove. Believe you me, I wanted this to work in the oven so badly, so I can set it and forget it, but unfortunately the results were very disappointing. The crust would barely brown even after 1 hour in the oven, the texture was just off and the cheese hardened. So trust me, and I say this with a heavy heart since I love the oven more than anything else, but the stove is the only way to go here. Plus it only takes about 15 minutes, if not less.
So…set the pan over one side of the stove top, making sure the flame is covering only half the pan’s bottom. If the pan is centered over the stove top, the center of the knafeh will burn, before the sides get a chance to cook.
Using tongs in one hand and wearing oven mitts in the other, rotate the pan continuously for even baking. As the crust starts to cook, the cheese will start to melt and exude moisture. So you’ll need to pat the cheese with a clean cloth or kitchen towels to absorb any released moisture, as this can make for a make for a soggy crust.
Continue rotating the pan until the very edge of the crust turns deep golden brown and the cheese is almost melted; 10 to 15 minutes. The edge of the crust is your indicator; whatever color it is, is the actual color of the knafeh’s bottom.
Time to flip! Remember those 3 tablespoons of farkeh that we had saved aside. Now sprinkle those on top of the cheese. They will absorb any excess moisture, plus prevent the cheese from sticking to the serving platter.
Moment of truth…Whoops! The center of mine got slightly burnt and it was due to the pan’s bottom being warped. So lesson learnt…only perfectly level pans from now on!
After getting over the burnt center, wiping a teardrop or two…syrup goes over the knafeh…
…and ground pistachios come to the rescue to hide the burn. Shhhhhh…no one needs to know.
Now this is a dessert that must be served warm, while the cheese is still all ooey and gooey. So you either serve it right away or reheat over a steaming water bath…that shall do the trick and will keep the cheese all nice and molten for hours.
Like sooooo….

No comments:
Post a Comment